Investment Banking PowerPoint Shortcuts: Your 30-Minute Crash Course

Whenever internships begin, we get a lot of questions about how to “prepare quickly.”
A long time ago, most questions were about Excel, financial modeling, and how to find data quickly.
Today, they’ve shifted to programming languages, automation tools, and AI (e.g., can InternGPT do everything for you?).
I get the obsession with The Shiny New Thing, but if you’re a new hire in banking or another corporate finance role, boring old PowerPoint might be your highest-ROI skill.
It doesn’t take that much time to reach a decent proficiency level, and in many groups, you’ll spend more time in PowerPoint than Excel.
Since PowerPoint is an important-but-often-overlooked skill, this article will give you a 30-minute crash course on the most important parts:
Investment Banking PowerPoint Shortcuts: The Tutorial, the PDF Guide, and More
I recommend starting by grabbing the free PowerPoint shortcut guide and other documents below:
- Investment Banking PowerPoint Shortcuts (PDF)
- PowerPoint Crash Course – Slides (PDF)
- Reference Slides Used in This Tutorial (PPT)
And then you can watch the full crash-course video or read the written summary below:
Table of Contents:
- 2:17: Part 1: Quick Access Toolbar
- 4:16: Part 2: Windows Shortcuts & Slide Fundamentals
- 10:01: Part 3: Inserting and Formatting Shapes
- 15:01: Formatting Shortcuts
- 20:02: Part 4: Aligning and Distributing Shapes
- 27:55: Part 5: Grouping and Ordering Shapes
- 30:54: Recap and Summary
This video and the written version below are extremely condensed versions of our PowerPoint & VBA course.
The course is about 30x more detailed and has a full macro package, practice exercises, and extensive VBA training, but you can easily get started with this shorter version.
Investment Banking PowerPoint Shortcuts: The Quick Access Toolbar (QAT)
The Quick Access Toolbar in Office programs lets you build shorter versions of existing shortcuts.
If you execute certain commands 500 times per day, entering them with 2 keystrokes rather than 4-5 results in significant time savings.
We make our recommended PowerPoint QAT freely available right here, so you should download it and follow the installation instructions.
If you cannot install it, you can also create the QAT yourself via the Options menu (Alt, T, O).
Enter the menu, click “Quick Access Toolbar” on the left side, and go to “All Commands” to add the ones you want:
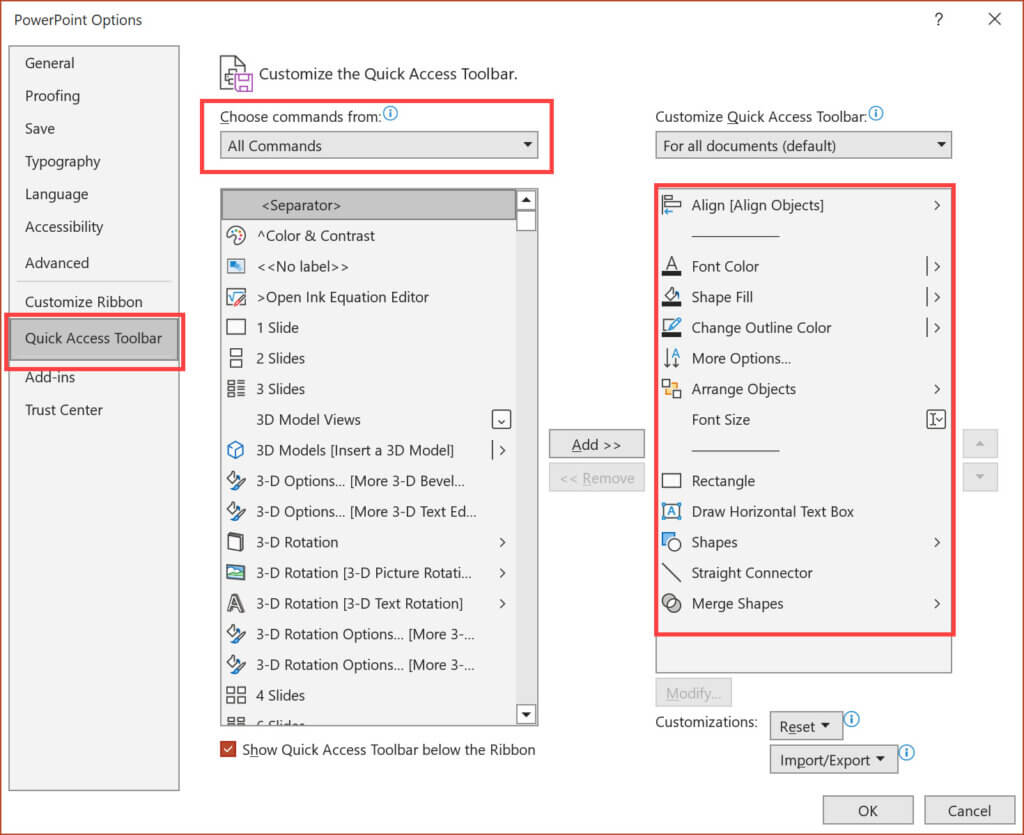
Slide #8 in the presentation has the full list and the proper order.
Investment Banking PowerPoint Shortcuts: Windows/Office and Slide Commands
All the standard Windows/Office shortcuts work in PowerPoint as well.
This includes shortcuts like Ctrl + N for creating a new file, Ctrl + O for opening an existing file, and Ctrl + C, Ctrl + X, and Ctrl + V for Copy, Cut, and Paste.
Look at slides 9-11 of the presentation or the shortcut reference guide for more; they’re all important and useful, but you should already know them.
If you’re on the Mac, you can substitute the “Command” key (CMD) for Ctrl and make most of these work – but check the guide for the full details.
With these shortcuts, you should be careful with your selected range because you can select either slides or specific shapes in PowerPoint:
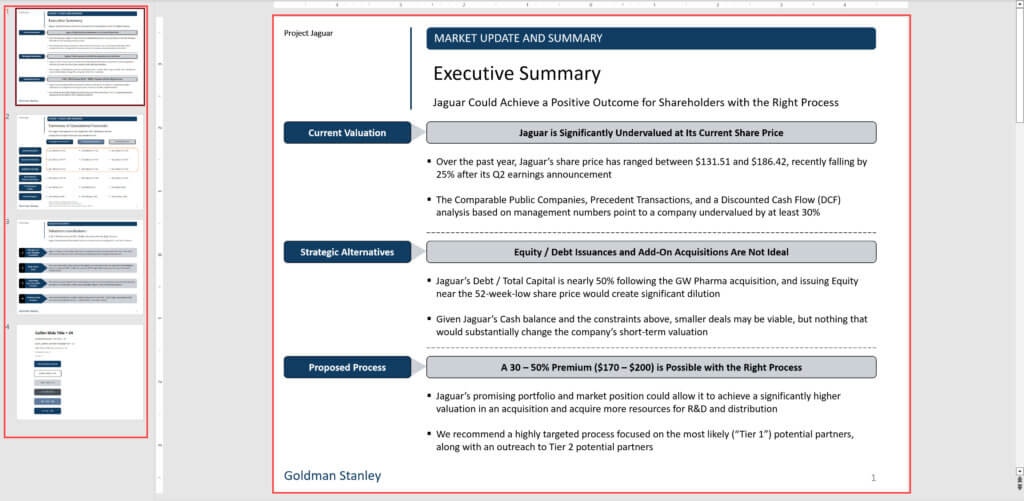
If you’ve just clicked something in the left pane, a shortcut like Ctrl + A will select all the slides in your presentation.
But if you’ve just clicked something in the right pane for your current slide, Ctrl + A will select all the shapes on this slide.
Once you’ve reviewed the key Windows/Office shortcuts, the next-most important ones are the slide shortcuts.
To insert a new slide, press Ctrl + M (new slide based on your current template) or Alt, H, I (pick the template you want to use).
The “+” symbol in these shortcuts means “press the keys sequentially, hold them, and then release them at the same time.”
The “,” symbol means, “press the key, release it, and then press the next key.”
So, for Ctrl + M, you press and hold Ctrl and M and then release both; for Alt, H, I, you press Alt, release it, press H, release it, and then press I and release it.
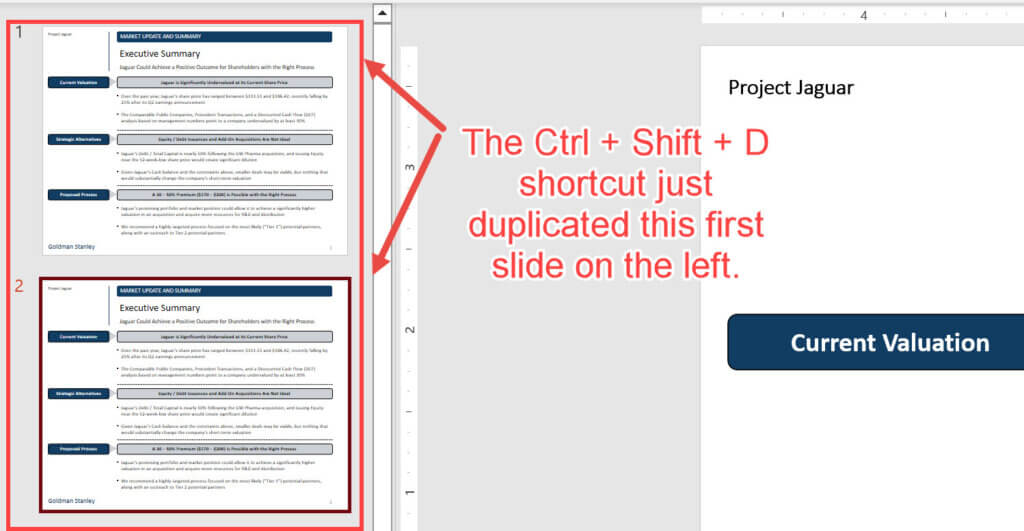
You can also use Ctrl + Shift + D to duplicate your current slide, regardless of your selection.
The Home and End keys jump to the first and last slides, respectively, while PgUp and PgDn advance to the previous and next slides.
Of all these shortcuts, I probably use Ctrl + Shift + D the most because it’s very common to copy and tweak existing slides in pitch books and other investment-style presentations:
Investment Banking PowerPoint Shortcuts: Inserting and Formatting Shapes
In presentations and pitch books, you’ll need to insert shapes, text boxes, and lines when you’re adding and editing slides.
The most important shortcuts are:
- Alt, 09: Draw Shape
- Alt, 8: Draw Rectangle
- Alt, 9: Draw Horizontal Text Box
- Alt, 08: Draw Line
- Shift + Draw Shape: Draw Shape with a Constant Height/Width Ratio
The first four in this list require our QAT to be installed.
If you’re wondering about the difference between a shape and a text box, a shape has a fill color, centered text, and a white font color.
A text box has no fill color, left-aligned text, and a black font color.
But you can easily change one to the other, so there’s no real difference in simple use cases.
Drawing a shape or inserting the default-sized shape is up to you, but if you want to draw it, you should activate the shortcut and then click the shape with the mouse:

If you want to insert a default-sized shape, you should use the arrow keys to navigate to the shape and press the “Enter” key.
Once you have inserted multiple shapes, the Shift key is essential for selecting them, resizing them, and moving them around:
- Shift + Left Click: Select Multiple Shapes (or use the mouse – often faster/easier)
- Shift + Drag Diagonal Edge: Resize Shape & Keep Height/Width Ratio Constant
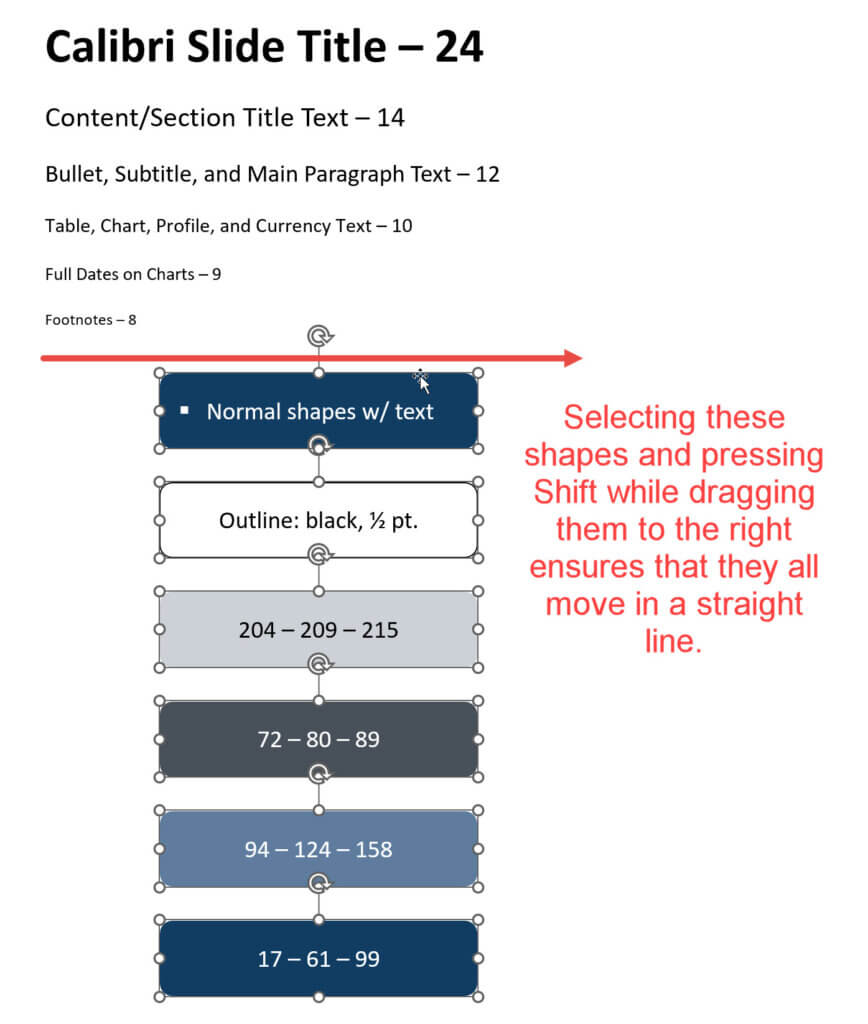
- Shift + Drag Shape: Move Shape & Keep Horizontal or Vertical Axis Constant
I find the Shift + Drag Shape shortcut the most useful because there’s no other way to move shapes in a straight line.
It’s especially good when you’ve selected multiple shapes and want to move them all in one direction:
Formatting Shapes
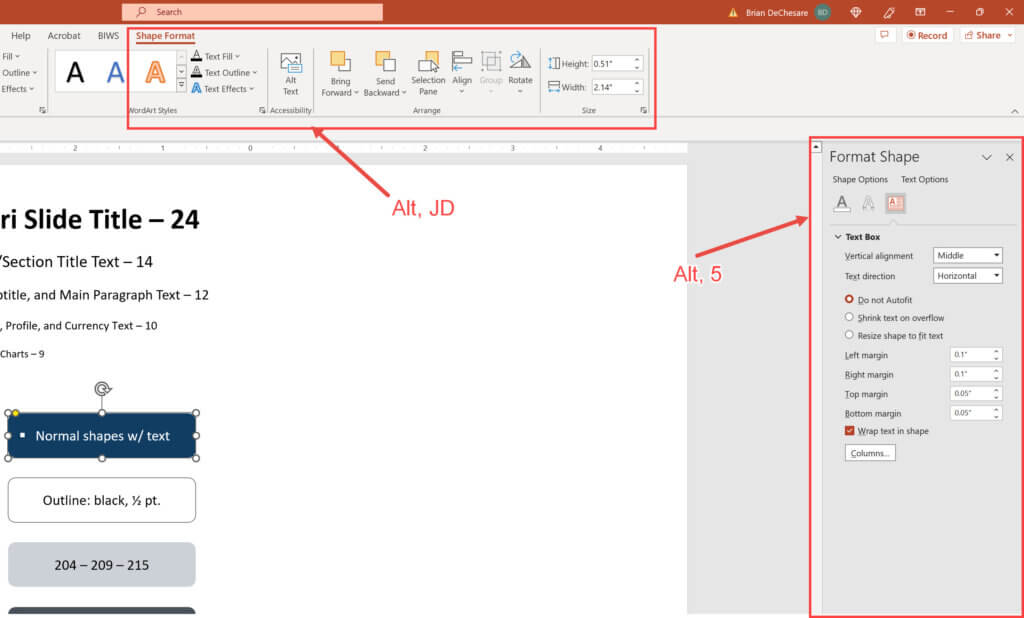
The two key shortcuts here are Alt, 5, which brings up the “Format Shape” menu on the right side of PowerPoint, and Alt, JD, which brings up the “Shape Format” area in the ribbon menu.
The difference is that Alt, 5 gives you more options but is slower to access, while Alt, JD is good for quick/simple edits, such as changing a shape’s height and width:
You can also use shortcuts for more specific formatting changes.
For example, Alt, 2 changes the Font Color, Alt, 3 changes the shape’s Fill Color, and Alt, 4 changes its border colors, weight, styles, etc.
Alt, 7 lets you change the font size, and the standard Windows shortcuts for bolding, italicizing, and underlining text also work (Ctrl + B, Ctrl + I, and Ctrl + U).
You can left-align, center, and right-align text with Ctrl + L, Ctrl + E, and Ctrl + R.
You can format specific text in a shape (if you use the mouse to select only parts of the text) or the entire shape (if you click the entire shape).
But it’s almost always better to format the entire shape for consistency:

Once you have your slides set up, you don’t want to reinvent the wheel, so you should learn the shortcuts for copying and pasting shape formats and duplicating shapes:
- Ctrl + Shift + C: Copy Shape Format
- Ctrl + Shift + V: Paste Shape Format
- Ctrl + D: Duplicate Object(s)
- Ctrl + Shift + Drag: Duplicate Object(s) in Place
Copying and pasting shape formats have their uses, but I use Ctrl + Shift + Drag the most often:
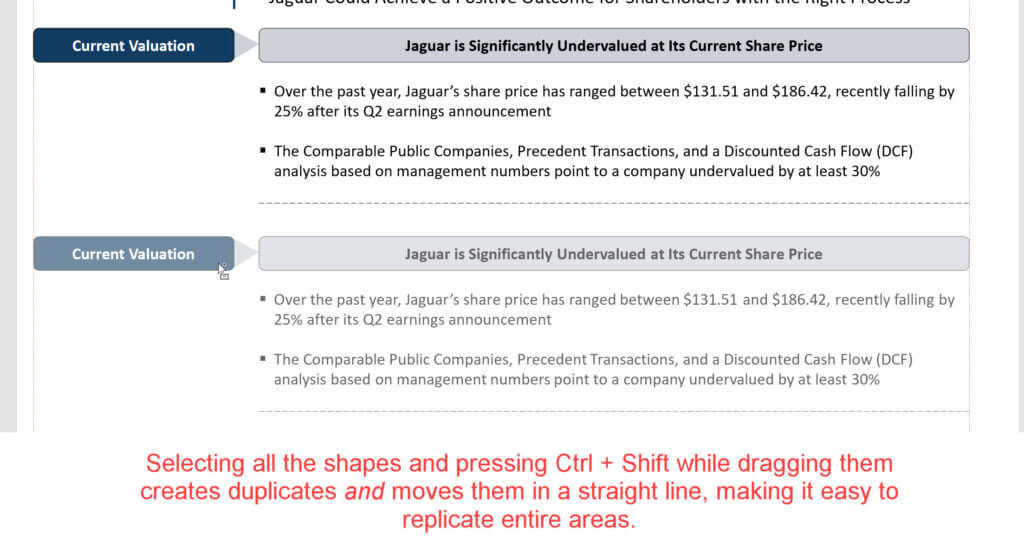
It’s essential on any slide with multiple columns or rows in a grid-like layout when you want to add a new area.
Investment Banking PowerPoint Shortcuts: Aligning and Distributing Shapes
When you start inserting new shapes and creating slides, you’ll rarely align everything perfectly on your first try.
You’ll also come across a lot of slides that look like this:
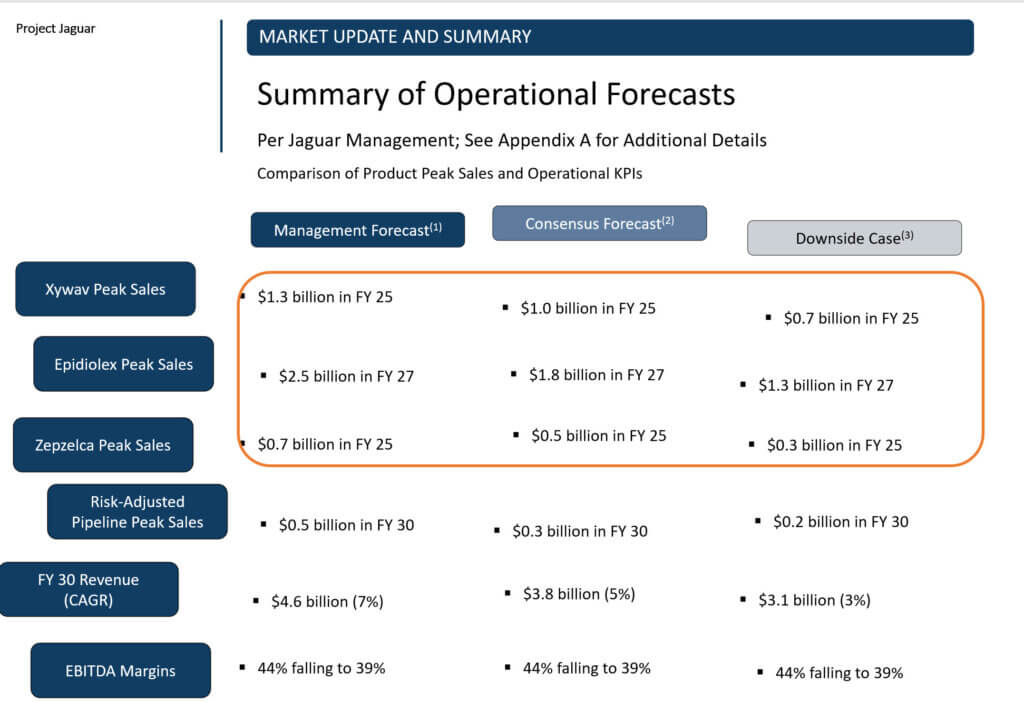
You probably don’t want to show this slide to a client or your Managing Director in its current form.
You can fix these issues with the alignment and distribution shortcuts.
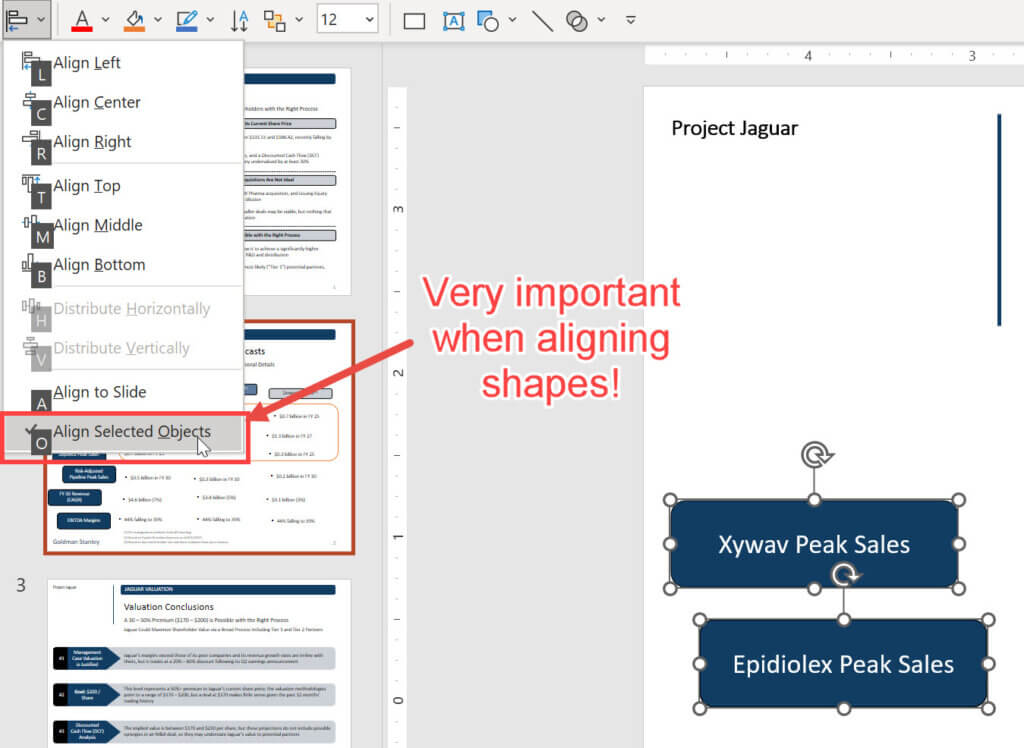
With both these commands, there are two modes: “Align to Slide” and “Align Selected Objects.”
By default, PowerPoint uses “Align to Slide,” but you almost always want to use “Align Selected Objects.”
To change this setting, select at least two shapes (using Shift + Left Click or the mouse), press the Alt, 1 shortcut, and then press “O” for “Align Selected Objects”:
Once you’ve done this, you can fix the alignment on slides like the one above using these shortcuts:
- Ctrl + Mouse Scroll Wheel or Alt, V, Z: Zoom
- Alt, 1, L / C / R: Align Left / Center / Right
- Alt, 1, T / M / B: Align Top / Middle / Bottom
These alignment commands work by finding the furthest edge of your selection and aligning everything else to it.
For example, if you select all the rounded blue boxes on the slide above and press Alt, 1, L, you’ll get something like this:
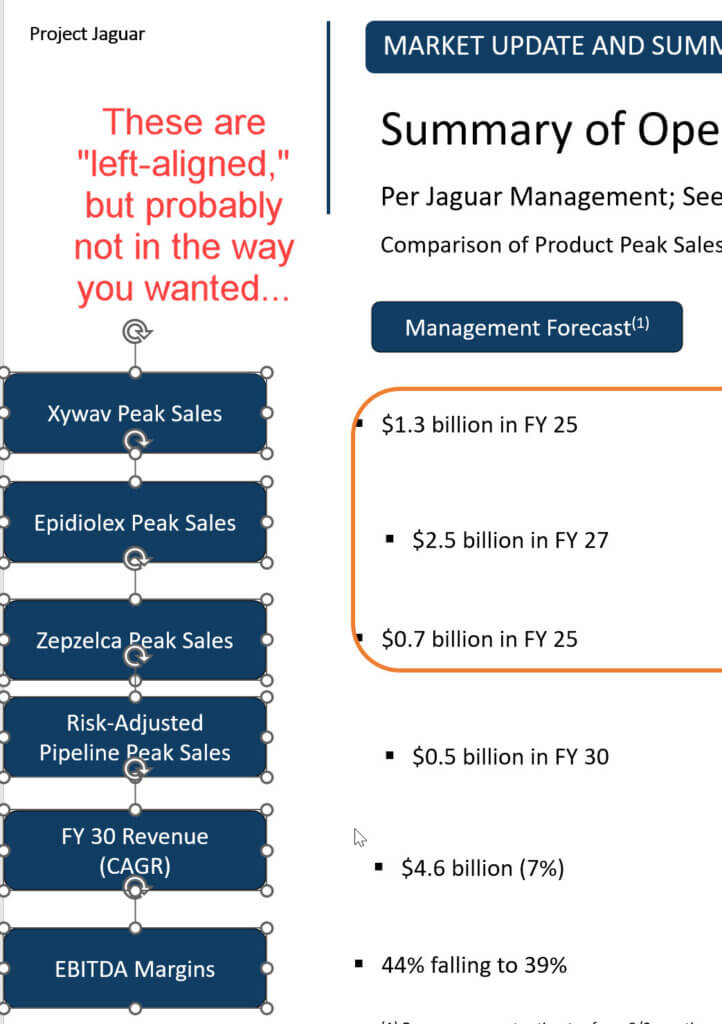
But you probably want to left-align everything to the “Project Jaguar” or “Goldman Stanley” text so there’s padding on the left side.
To do that, move the entire selection of blue boxes to the right of the “Project Jaguar” text with Shift + Drag, add the “Project Jaguar” textbox to the selection with Shift + Left Click, and then press Alt, 1, L:
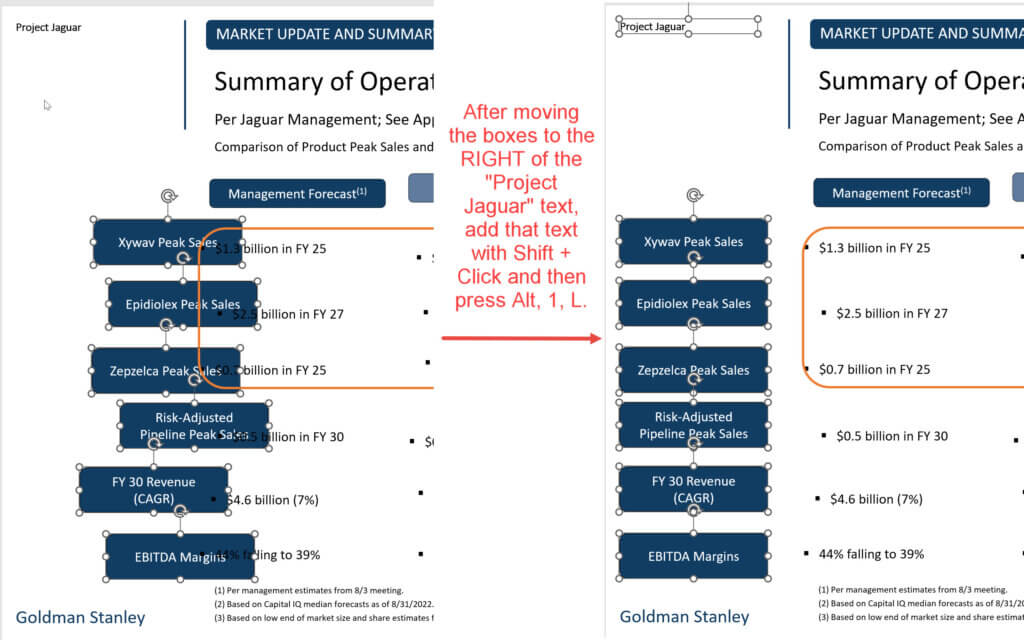
You can keep going with these commands and fix most of the other issues on this slide.
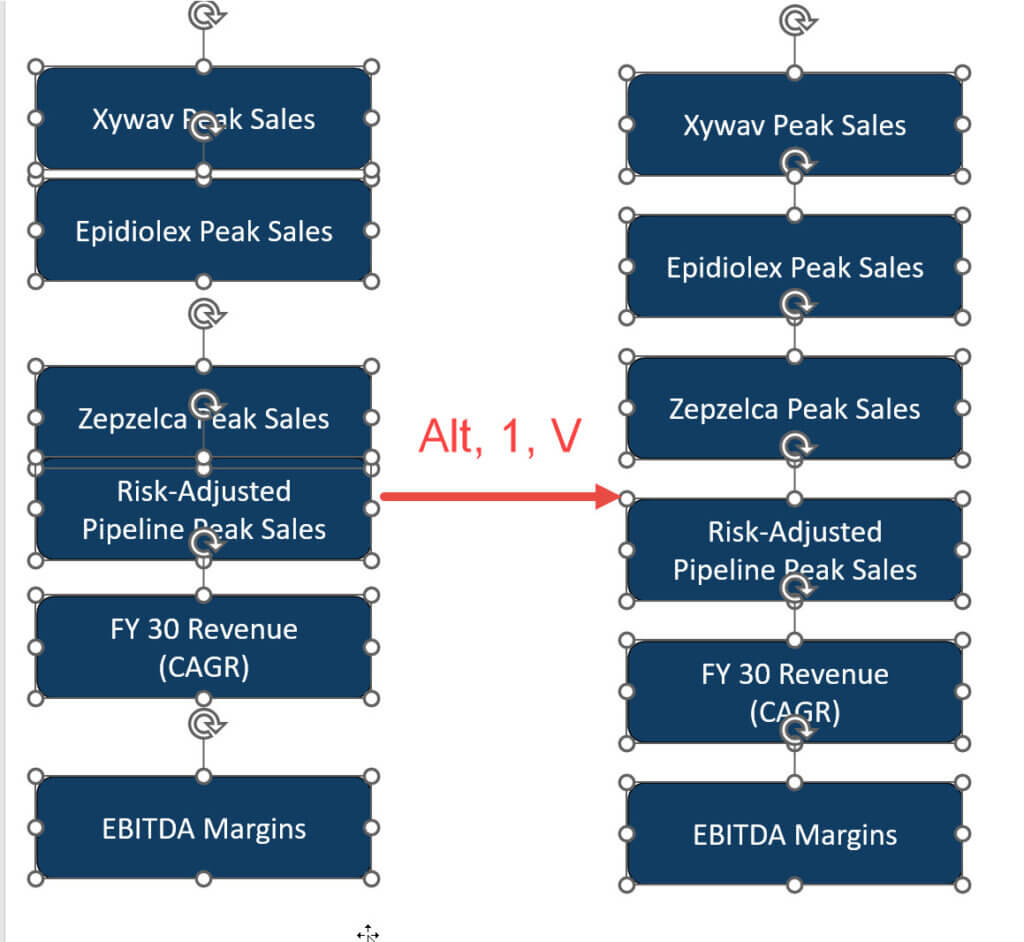
But even if you’ve aligned the objects properly, there may not be equal spacing between them.
To fix this, you can use the distribution commands: Alt, 1, H for Distribute Horizontally and Alt, 1, V for Distribute Vertically.
Taking these rounded blue boxes as the example once again, here’s what the Alt, 1, V command does:
If you want to get even better at alignment and distribution, you can use the Ruler, Smart Guides, and Drawing Guides in PowerPoint.
You can toggle the Ruler off and on with the Alt, W, R shortcut; I almost always keep it enabled because it takes up very little space.
You can enable Smart Guides by pressing Alt, W, X and checking the “Display Smart Guides” option:
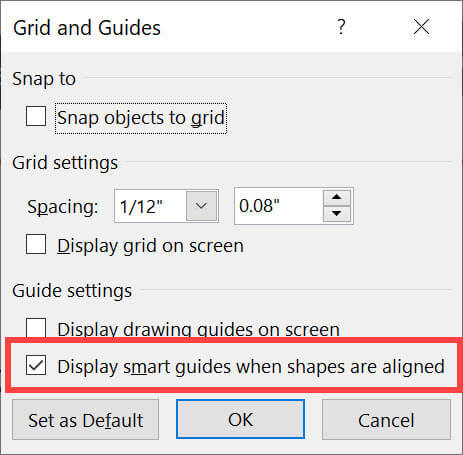
Once you do this, dashed, orange lines will appear whenever you’ve aligned objects correctly or arranged them with equidistant spacing.
This feature helps a lot because it lets you fix shapes without selecting everything and entering the alignment/distribution commands:

Finally, you can activate Drawing Guides with the Alt, W, S shortcut.
These lines appear on every slide in the presentation, and you can use them as references for the shapes and other layouts you want to create.
To create a new Guide, press and hold Ctrl and drag the mouse on an existing one:
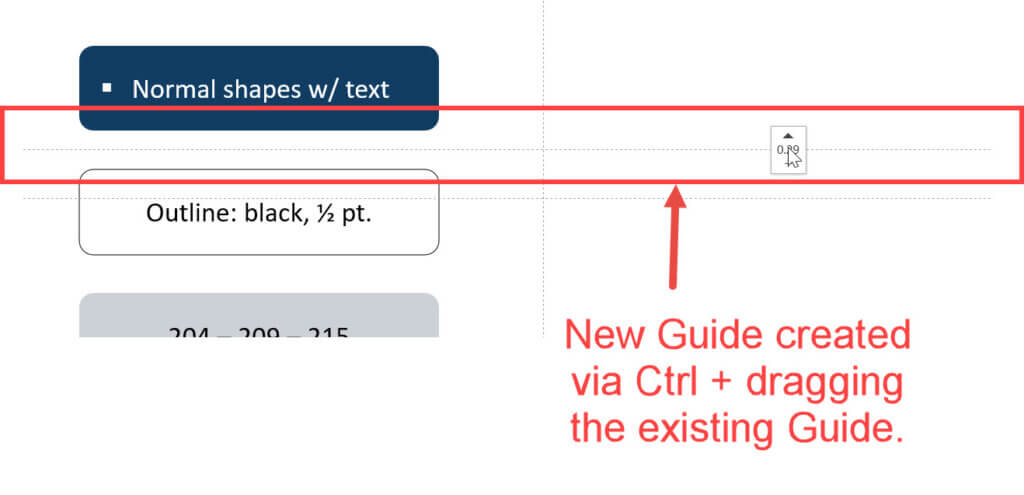
To delete it, drag the Guide off the slide’s edge.
Investment Banking PowerPoint Shortcuts: Grouping and Ordering Shapes
While you can select multiple shapes with Shift + Left Click and move them around, it’s often easier to group them so you can treat them like a single shape.
They’re also much easier to resize and “swap” with other shapes when they’re grouped.
The key shortcuts are:
- Ctrl + G: Group Shapes
- Ctrl + Shift + G: Ungroup Shapes
Grouping is especially useful on a slide like this if you want to rearrange the order of the scenarios:
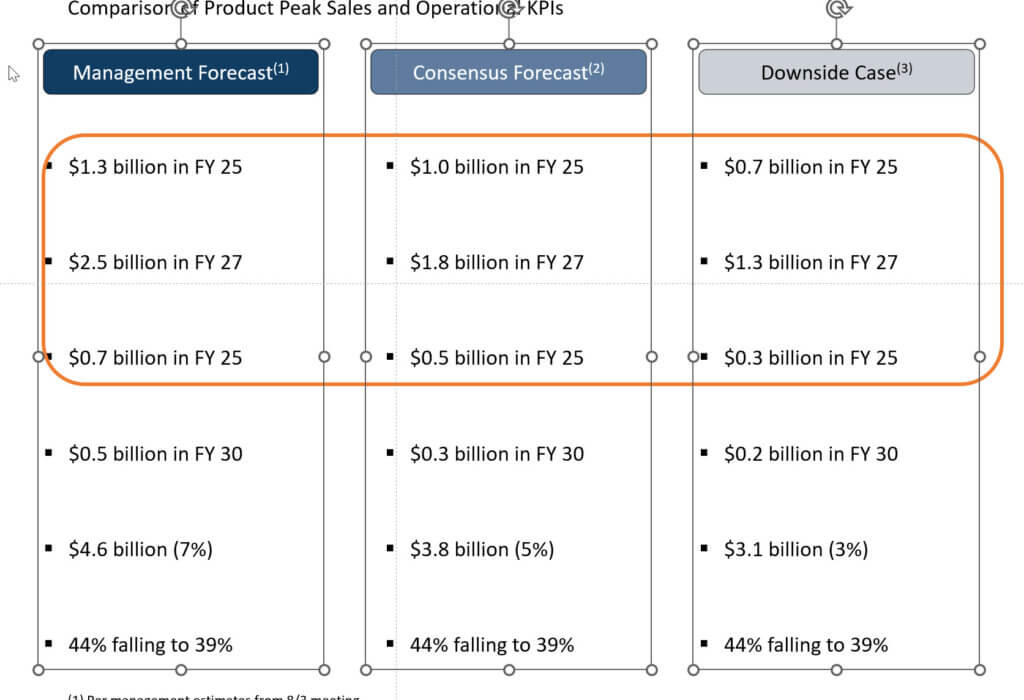
Moving around each column is much easier when it’s treated as a single shape.
Finally, moving objects forward and backward is useful when you’re working with “compound shapes,” like these arrows:

The most useful commands here are Alt, 6, R for Bring to Front and Alt, 6, K for Send to Back.
With these commands, you can click a shape and change its “position” on the slide so that it moves on top of or below the other shapes.
These commands are useful for fixing the issues on the slide above:

…but they’re not that important.
I use the alignment and distribution commands 10x more often than these ordering shortcuts.
Investment Banking PowerPoint Shortcuts: What’s Next?
If you follow along and learn the shortcuts above, you will be ahead of ~80% of interns.
That said, this 30-minute tutorial only scratches the surface of PowerPoint.
Topics covered in our PowerPoint & VBA course that we skipped here include the Slide Master, sections, text and tables, Excel and Word integration, images, maps, and macros in PowerPoint.
If you learn something about these topics, you’ll become even faster at key tasks and more likely to leave the office before 3 AM.
Even if you have no interest or time/money for our full course, I recommend looking at the ~10 free PowerPoint tutorials with screenshots and videos within the BIWS Knowledge Base.
They’re not as good as having your own InternGPT – but they also give you a more realistic path to winning a full-time return offer.
Free Exclusive Report: 57-page guide with the action plan you need to break into investment banking - how to tell your story, network, craft a winning resume, and dominate your interviews


